I am super excited to announce that I have officially updated my blog and have moved a bigger and better website BiteofHealthNutrition.com! I finally bit the bullet and invested in a better website platform to give you a new and improved design and layout that I think you are going to love. I am hoping that this change will not only improve my material but provide you with a better experience.
Starting today please visit BiteofHealthNutrition.com for more of my nutritious and delicous recipes, nutrition tips and product reviews. I will also be available for individual nutrition couseling services. Please stop by for more information! See you all there :)

Tuesday, June 30, 2015
Wednesday, June 3, 2015
Salted Chocolate Almond Butter
"I received free samples of Blue Diamond Almonds mentioned in this post. All opinions are my own. "
One of my favorite treats, chocolate covered almonds, takes on a whole new form in my Salted Chocolate Almond Butter. Spreadable chocolate? Yes please! I was looking for an alternative to Nutella, as I am not a huge fan of hazelnuts or all the added sugar. I started with my simple almond butter recipe and added the cocoa powder and some dates for natural sweetness. If you don't have dates, honey would work just as well.
I thought the spread would go great with crackers like Blue Diamonds Almond Nut thins as a perfect afternoon snack. And was I right! The crunch and saltiness from the crackers paired perfectly with the sweet nutty flavor of the chocolate almond spread. Even better, this snack is gluten free.


Ingredients
- 1 1/2 cups roasted unsalted almonds
- 1 1/2 tablespoons unsweetened cocoa powder
- 1 date (or 1 tablespoon honey)
- 2 teaspoons coconut oil, melted
- 1/4 teaspoon sea salt
- Blue Diamond Almond Nut Thins
1. Add almonds to food processor. Process about 5 minutes until smooth, scraping down sides with spatula every minute.
2. Add in cocoa powder, date, coconut oil and blend for another 1-2 minutes until evenly combined.
3. Mix in salt.
4. Serve with Blue Diamond Almond Nut Thins. Follow my blog with Bloglovin
Thursday, May 28, 2015
Homemade Pancake Mix
One of my favorite meals on the weekends is pancakes. If we are not enjoying Sweet Potato Pancakes from our favorite local diner, I am usually making my own pancakes at home. Needless to say I make a lot of pancakes! My husband is a big fan of the plain old version, but I like to mix it up a bit from time to time.
What I am not a fan of is boxed pancake mix. Not only is it made with processed ingredients and additives but is way more expensive than the ingredients themselves. Plus if I can make it myself from basic ingredients in my pantry, why not. If you ask me, homemade pancakes are just that much tastier! I like to make mine with part white whole wheat flour for added nutrients, fiber and a nuttier flavor. My one complaint with making pancakes from scratch is that they tend to be time intensive.
To make things easier on myself I decided to come up with a basic pancake mix that I can pull out whenever I want to make pancakes. This way the measuring is done and all I need to add is the wet ingredients and any other flavorings or mix-ins.

This week I used my pancake mix to make my all-time favorite Cinnamon Apple Pancakes. I can eat them just about any time of year. You can use the mix to make just about type of pancake your heart desires. To each cup of pancake mix just add in 1 cup of milk, 1 egg, 2 tablespoons of butter or oil and any flavoring you want! Easy and breakfast is on the table in 20 minutes! And if you are looking for a quick weeknight dinner, pancakes are always an option! Now if "Brunch" is breakfast for lunch what would breakfast for dinner be?


Homemade Pancake Mix
(Makes about 4 cups)
Ingredients
- 2 cups All-purpose flour
- 2 cups white whole wheat flour
- 1/4 cup sugar
- 2 teaspoons baking powder
- 1 teaspoon baking soda
- 2 teaspoons salt
For every 1 cup of pancake mix add in 1 egg, 1 cup of milk, 2 tablespoons unsalted butter or oil.
Cinnamon Apple Pancakes
Makes: 8 pancakes (4 servings)
Makes: 8 pancakes (4 servings)
Ingredients
- 1 cup homemade pancake mix
- 1/2 teaspoon cinnamon
- 1/8 teaspoon nutmeg
- 1 cup milk or milk alternative(almond milk, soy milk, etc.)
- 1 egg
- 2 tablespoons unsalted butter, melted
- 1 teaspoon vanilla
- 1/2 cup apples, peeled and diced
Directions
1. In a large mixing bowl, combine pancake mix, cinnamon and nutmeg.
2. In a medium bowl add all wet ingredietns (milk, egg, butter, vanilla) and whisk to combine.
3. Add wet ingredients to dry ingredients and mix until just combined.
4. Fold in diced apples.
4. Heat griddle to 350 degrees or if using frying pan heat on medium heat. If using non-stick surface lightly spray with cooking spray. Using a 1/3 cup measuring cup spoon batter onto heated surface. Cook for 2-3 minutes or until bubbles form on the top of the pancakes. Flip and cook for antother 2-3 minutes.
Follow my blog with Bloglovin
Thursday, May 21, 2015
Blueberry Frozen Yogurt Pops

Happy May 21st! This month's recipe redux theme is DIY kitchen essentials. With the warmer weather upon us I decided to make one of my summer kitchen essentials...popsicles. When the summer months come I am always looking for a cold treat. Unlike my husband who can eat ice cream every night, I prefer something a bit healthier on occasion. So I created my Blueberry Frozen Yogurt Pops to indulge in without the guilt. And get this, there are only two ingredients in this recipe and I bet you have both in your refrigerator right now. All you need is Greek yogurt and fruit. I used vanilla Greek yogurt and blueberries, but whatever flavor combination you like, go for it!

This recipe ended up requiring a lot of improvisation and creativity. For one, I lost my Popsicle molds and, two I didn't have Popsicle sticks. But turns out a muffin tin is a great Popsicle mold. Sure, the shape is different but I actually had an easier time getting them out than I did using the molds. Also, the colorful straws I had added the perfect pop of color and held up the Popsicles just fine.

These popsicles make a great dessert, but are equally as healthy for a cold breakfast on a hot summer morning or as a cool afternoon snack. And if one isn't enough, go for a second. I promise you won't be judged. :)
Blueberry Frozen Yogurt Pops
Servings: 3
Ingredients
Blueberry Frozen Yogurt Pops
Servings: 3
Ingredients
- 1 cup vanilla non-fat Greek yogurt
- 1/2 cup fresh or frozen blueberries (can substitute with other fruits)
Directions
1. Mix blueberries into yogurt and evenly spoon mixture into 6 muffin cup tins.
2. Place a 3-inch cut straw or Popsicle stick into each.
3. Place muffin tin in freezer for at least 3 hours. Remove and let sit on the counter for 5 minutes to make it easier to remove pops from muffin tin.
4. Enjoy or place in air tight container in thefreezer and enjoy throughout the summer!
Tuesday, May 12, 2015
Strawberry Rhubarb Sauce
One of my favorite parts of the spring and early summer is enjoying a nice slice of strawberry rhubarb pie. The strawberries add just enough sweetness to help cut the tart flavor from the rhubarb, and the combination of the two together can not be beaten. My mouth is salivating just thinking about it. Yummm. When I saw rhubarb at the store this week I had to pick some up. Unfortunately, I didn't have the time or ingredients to make a pie. So instead I came up with an almost perfect substitution... Stawberry Rhubarb Sauce.

My Strawberry Rhubarb sauce was the perfect replacement. It is basically all the goodness of the pie filling, without the crust. And I promise you will not miss it once you taste a spoonful of this sauce. And even better, the sauce only contains four ingredients and takes a total of 20 minutes to prepare and cook. An all around winning recipe if you ask me!

I have been adding the sauce to just about anything. In the morning, I have it with my yogurt and some granola. It is almost like eating dessert for breakfast but without all the guilt. The sauce would be great on top of pancakes, waffles, or toast as a substitute for jam. It even tastes amazing on oatmeal or as a topping for ice cream, which my hubby has been enjoying. You decide. The options are endless!

Strawberry Rhubarb Sauce
Servings: 16 (1/4 cup per serving)
Ingredients
- 1 pound strawberries
- 1 pound rhubarb
- 2 tablespoons lemon juice
- 2 tablespoons honey
Directions
1. Core strawberries and cut into quarters, then cut rhubarb into 1/2 inch pieces.
2. Add strawberries, rhubarb, lemon juice and honey into a large sauce pan. Cook on medium heat for 15 to 20 minutes stirring occasionally to prevent the sauce from sticking. (Makes about 4 cups)
3. Let cool then store in glass jars. *
*Sauce will thicken when cooled. Sauce will keep in the refrigerator for two weeks or in the freezer for 3 months.
Tuesday, May 5, 2015
Dried Plum and Walnut Empanadas with Goat Cheese
"I received free samples of California Dried Plums mentioned in this post. By posting this recipe I am entering a recipe contest sponsored by California Dried Plum Board and am eligible to win prizes associated with the contest. I was not compensate for my time."

The California Dried Plum Board is challenging us Recipe Reduxers to develop a healthy and delicious recipe using dried plums. Dried plums are a great snack, but I'll admit I have never used them to cook with. But boy have I been missing out! Dried plum are super versatile. They can be used as a substitute for fat and sugar in baked goods, added to salads, yogurt or cereal, and even made into sauces and marinade for a savory dish. The options are endless!
Also, did you know dried plums help to support healthy bones?! Research shows that just one serving of dried plums (about 4 to 5 dried plums) may be effective in preventing bone loss in older, postmenopausal women. And even if your not postmenopausal or a women it can't hurt to get your daily dose of dried plums!

With today being Cinco de Mayo, I decided to use the dried plums to make a mexican style sweet empanada. The filling is made with dried plums, walnuts, cinnamon and brown sugar. To compliment the sweetness of the plums I added some goat cheese, and oh boy do they work well together!! The filling is wrapped with my quick pastry dough made with only white whole wheat flour and vegetable oil! Super simple to make and a healthy alternative to regular pastry dough which is typically full of trans fats.

After forming the empanadas, I baked them in the oven at 375 degrees for 20 minutes. They came out warm, flakey and delicious! These empanadas are like personal mini pies that are packed with nutrients and are actually good for you!

Dried Plum and Walnut Empanadas with Goat Cheese
Servings: 4 (makes about 12 Empanadas)
Ingredients
Pastry Dough
- 1 cup white whole wheat flour
- 1 cup all purpose flour
- 1/2 teaspoon of salt
- 1/2 cup vegetable oil
- 5 tablespoons water
Filling
- 1/2 cup dried plums
- 1/3 cup walnuts, roasted
- 1/4 cup brown sugar
- 1/4 teaspoon cinnamon
- 1-2 tablespoons water
- 2 ounces of goat cheese
- 1 egg, whisked
Directions
Pastry Dough
Pastry Dough
1. In a medium size bowl mix together flour and salt. They mix water and oil then add to flour until just combined. Gather dough into two balls and knead each ball for about one minute. Then cover in plastric wrap and chill in the refrigerator for 30 minutes.
2. While dough is chilling combine all filling ingredient except for goat cheese in a food processor until smooth.
Empanadas
Empanadas
3. Preheat oven to 375 degrees.
4. Remove dough from the refrigerator. With a floured rolling pin, roll out one dough ball into a 12 inch round about 1/8 inch thick on a lightly floured surface. Cut out rounds with 3 inch flour cookie cutter. (I used a glass that was about 3 inches in diameter)
5. In the center spread about 1 teaspoon goat cheese, then top with about 2 teaspoons of dried plum and walnut mixture. Brush egg wash halfway around the edge, then fold dough over forming a half moon shape. Seal the edges with a fork then cut three slits in the top of pastry. Lastley, lightly brush egg wash over the top of the pastry.
6. Repeat for second dough ball.
6. Repeat for second dough ball.
7. Place pastries on baking sheet and bake for 20 minutes.
Follow my blog with Bloglovin
Tuesday, April 28, 2015
Roasted Asparagus and Ricotta Crostini with Pea Pesto

I've got another delicious appetizer for you that has spring written all over it! I am a huge fan of asparagus, and love that you can find it in just about any grocery store this time of year. Asparagus is packed with flavor and is a great source of vitamin K and folate. And at only 25 calories a serving, how can you say no?!
Peas on the other hand, I could take them or leave them. As a kid the only way I would eat peas was if they were frozen. Today I am still picky when it comes to peas but have recently discovered pea pesto and may have been converted. I mean, add garlic and Parmesan cheese to anything and it will taste good! Peas are also a great source of protein, fiber and are packed with antioxidants.

I used the pea pesto to make a quick crostini with ricotta and leftover roasted asparagus, and it was all done in 5 minutes or less! The pea pesto was also great later used as a dressing mixed with roasted vegetables and to add color and flavor to a white pizza.
Also, I have to thank my cousin Liz for giving me a food photography lesson and helping me take these awesome pictures. She is an extremely talented photographer and her work always amazes me! You should check her out at Purestyle Photography.

Roasted Asparagus and Ricotta Crostini with Pea Pesto
Makes about 4 servings ( 1 serving = 3 Crostini)
Ingredients
- 12 asparagus stalks
- 1 tablespoon olive oil
- salt/pepper to taste
- 1 french baguette
- 3/4 cup pea pesto (see recipe below)
- 3/4 cup ricotta cheese
- 1 cup peas, thawed
- 2 garlic cloves
- 1/3 cup olive oil
- 2 tablespoons lemon juice
- 1/2 cup Parmesan cheese
Directions:
1. For the pea pesto. Add all ingredients to a food processor. Blend on high until smooth. (Makes about 1 1/2 cups of pesto)
2. For the asparagus. Preheat oven to 400 degrees. Toss asparagus in olive oil, salt, pepper then place on baking sheet. Roast in oven for 15 to 20 minutes. Let cool then cut each stalk into three equal pieces.
3. Slice baguette into 1/2 inch pieces. Lightly toast, then spread with 1 tablespoon of pea pesto, 1 tablespoon of ricotta, then top with asparagus.
Follow my blog with Bloglovin
Tuesday, April 21, 2015
Dill Quinoa with Fava Beans
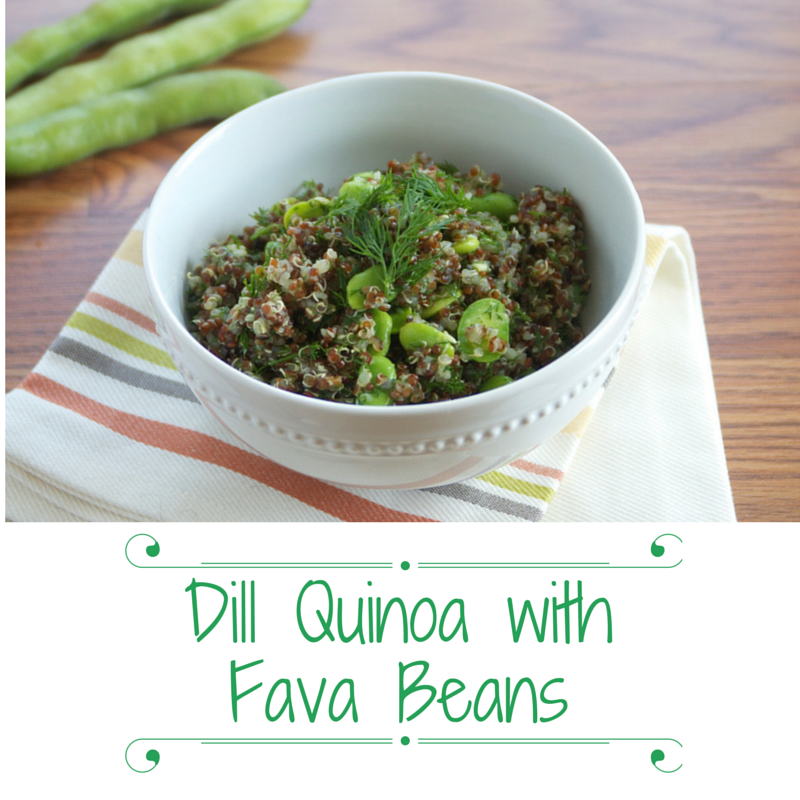
This months recipe redux theme is "Spring Cleaning". I'll admit I needed some motivation to get that done myself. School and work have takien over my life and cleaning has taken a back seat. My poor fridge and pantry have definitely taken a big hit. So disorganized! I was able to find some great odds and ends to use up and, with the addition of some seasonal ingredients and some inspiration from one of my favorite persian dishes, I came up with a recipe for Dill Quinoa with Fava Beans. That persian rice dish is "Baghali Polo", which literally translates to dill rice. Typically it uses basmati rice, fresh dill and lima beans. For a seasonal spin I used fava beans instead of lima beans and I used left over quinoa instead of rice.

Fava beans are a spring vegetable also known as broad beans. The beans come in pods, are edible once their waxy outer coating is removed, and are packed with protein, fiber, antioxidants, B vitamins and minerals.

To cook them remove the seeds from the pod, blanch in boiling water to soften, then remove the beans waxy outer skin. If you want to save yourself a step and some time, you can also find fava beans in the freezer aisle of most grocery stores already shelled. The beans go great in a salad, rice or quinoa dish, or can be mashed and used as a dip or spread.

I added all the ingredients together then added on some left over shrimp for more color, texture, and flavor. This dish is delicious warm, but is even better the next day cold! Overall this was the perfect dish to use up some left over ingredients, and I was able to add in a little spring freshness by adding the fava beans.

Dill Quinoa with Fava Beans
servings: 4
Ingredients
- 1 cup quinoa
- 2 cups low sodium vegetable broth
- 2 cups fava beans
- 1 1/2 cups of dill, diced finely
- 2 garlic cloves, minced
- juice from 1 lemon
- 3 tablespoons of olive oil
- salt/pepper to taste
Directions
1. Cook quinoa per package directions.
2. For fava beans. Remove beans from pod. Blanch beans in boiling water for 30 seconds, remove and place in ice water to stop cooking. Then remove the outer wax coat from the beans. You can also used frozen shelled fava beans, just remove from package and thaw.
3. Combine dill, garlic, lemon juice, olive oil and salt/pepper in a small bowl.
4. Once quinoa cooked add in fava beans and dill dressing and mix to combine.
5. Top with shrimp if desired.
5. Top with shrimp if desired.
Follow my blog with Bloglovin
Tuesday, April 14, 2015
Spicy Shrimp Tacos

I came up with this recipe last fall, but have been holding out until the weather got better to share it. Now that it finally feels like spring in Boston, it's about time! I came up with these delicious tacos in an attempt to make it on the big screen again. The Today show was just not enough!
My big dream in life has always been to be on the Food Network. I'll admit it: I am obsessed! Last fall I thought it may finally come true when I got an e-mail from the Food Network looking for home cooks. I created a video, put together a few recipes (this shrimp dish was one!), and hit submit! A week later I found out I had made it to the next round and went to NYC for a casting call. Ahhh! The casting call was one of the most nerve racking things I have done. There was well over 100 people there, all prepared with delicious looking dishes to share with the casting agency. I was intimiated to say the least!

Here I am with my wonderful hubby waiting in line for the casting call!

And here I am with my shrimp tacos waiting to be interviewed !
Sadly I never heard back after the interview, and am pretty sure "All Star Academy" on the Food Network is the show I was trying out for. Even though I didn't make it was a great experience and I'm glad I took my shot! It's inspired me to continue to to what I love, which is create delicious and healthy dishes to share with you all. And of course, there is always next season, right?! :)
So back to the Shrimp Tacos! I am a huge fan of fish tacos, but restaurants versions typically come fried. So for a lighter version I used sauteed shrimp instead. To add some fresh flavors I made a mango salsa with tomatos, cabbage, and avocado, and for some heat I whipped up a low fat chipotle sauce. The sweetness from the mango and the heat from the chipotle work really well together. A perfect light spring/summer dish that only takes 20 minutes to make!

Shrimp Tacos with Chipotle Mayo and Mango Salsa
Prep Time: 15 minutes
Cook Time: 5 minutes
Total time: 20 minutes
Servings: 4
Ingredients
Creamy Chipotle Sauce
- 1/3 cup light mayo
- 1/2 cup 0% plain greek yogurt
- 1-2 chipotle peppers
- 1 tablespoon adobo sauce
Mango Salsa
- 1 mango, diced
- 1 avocado, diced
- 1 medium tomato, diced
- 1 jalapeno, finely dices
- 1 tablespoon fresh cilantro, chopped finely
- 1 cup red cabbage, shredded
- juice 1/2 lime
- salt/pepper to taste
Shrimp
- 1 pound shrimp, peeled and de-veined
- 1 teaspoon chili powder
- 1/2 teaspoon cumin
- 1/4 teaspoon paprika
- 1/4 teaspoon pepper
- 1/8 teaspoon salt
- 1 tablespoon olive oil
Directions
1. For sauce. Combine all ingredients in a food processor until smooth. Set aside.
2. For salsa. Combine all ingredients, mix together and set aside.
3. For shrimp. Mix together chili powder, cumin, paprika, pepper, and salt then toss in shrimp and mix to evenly coat. Heat medium saute pan on medium high heat, add 1 tablespoon olive oil to pan, add in shrimp. Cook shrimp for 3-5 minutes or until shrimp turn pink. Remove shrimp from heat.
4. To make taco. Spread 1/2 tablespoon of chipotle mayo on half or corn tortilla, add on shrimp then mango salsa. Top with additional cilantro and lime for taste.
Thursday, April 2, 2015
The Truth About Eggs + Egg Recipe Round Up

With Easter just around the corner, I thought it was the perfect time to talk about one of my favorite pantry staples: eggs! Over the years eggs have gotten a bad wrap because of their cholesterol content. But studies indicate that cholesterol found in egg yolks and other animal products does not actually increase your blood cholesterol levels, saturated fat does. Dietary recommendations have slowly changed to reflect these findings and the preliminary report for the 2015 dietary guidelines relaeased last month reported that "cholesterol is not considered a nutrient of concern for overconsumption." Previous 2010 dietary guidelines recommended limiting yolks to one a day, but this looks to be changing in the upcoming 2015 guidelines. Also, when you cut out the yolk, you are also cutting out 1/3 of the protein and most of the vitamins and minerals.
So next time you think about just eating the egg whites, think twice! If you are trying to cut down your daily calorie and fat intake, cut the amount of yolk in half (for example 1 egg plus a second egg white). That way you are getting some of the nutrients without all of the calories.
Here are 10 easy and unique ways to enjoy eggs this easter and everyday, if you wish!


Follow my blog with Bloglovin
Monday, March 30, 2015
Banana Pancake Cupcakes with Maple Greek Yogurt Frosting

I am always trying to stay on top of recent food trends and try them out in my own kitchen. This time it is pancake cupcakes. I mean who doesn't want a cupcake for breakfast?! I usually top my pancakes and waffles with greek yogurt in place of some of the maple syrup for sweetness and protein. So when I saw a way to make greek yogurt frosting on healthy aperature, I had to give it a try! By straining out the liquid overnight you get a thicker, creamier yogurt that spreads like frosting.
 |
As many of you know my favorite combo is banana, peanut butter and chocolate so I topped the banana pancakes with chocolate chips and peanut butter drizzle. However, you can top these off whatever way you like. They came out perfectly moist and delicious and can be enjoyed just about anytime of day! |

Banana Pancake Cupcakes with Maple Greek Yogurt Frosting
servings: 6
Ingredients
Maple Greek Yogurt Frosting
- 2 cups greek yogurt
- 2 tablespoons maple syrup
Pancakes
- 1 cup milk
- 1 tablespoon vinegar
- 1/2 cup all-purpose flour
- 1/2 cup whole wheat flour
- 1/2 teaspoon baking powders
- 1/4 teaspoon baking soda
- 1/4 teaspoon salt
- 1 egg
- 1 banana
- chocolate chips (optional)
- peanut butter drizzle (optional)
Directions
Maple Greek Yogurt Frosting
1. Add greek yogurt to a large coffee filter and place in a stainer. Place strainer in a medium size bowl to catch any water that leaks. Cover with plastic wrap and place in the fridge over night.
2. The next day remove strained yogurt from the fridge and place in a medium bowl and mix in maple syrup.
Pancakes
1. Turn oven on to 350 degrees. Add paper liners to a muffin tin.
2. In a small bowl, add vinager to milk and set aside.
3. In a large mixing bowl add flours, baking soda, baking powder, and salt.
4. Whisk egg into milk mixture.
5. Add wet mixture into dry mixture and mix just until combined.
6. Slice banana thin and place a slice on the bottom of each muffin liner. Then add equal amounts of pancake mixture to each muffin liner ( I filled about half way). Top each with another slice of banana. Bake in oven for 15 to 20 minutes.
7. Slightly cool then top with maple yogurt fosting and additional toppings.
Follow my blog with Bloglovin2. In a small bowl, add vinager to milk and set aside.
3. In a large mixing bowl add flours, baking soda, baking powder, and salt.
4. Whisk egg into milk mixture.
5. Add wet mixture into dry mixture and mix just until combined.
6. Slice banana thin and place a slice on the bottom of each muffin liner. Then add equal amounts of pancake mixture to each muffin liner ( I filled about half way). Top each with another slice of banana. Bake in oven for 15 to 20 minutes.
7. Slightly cool then top with maple yogurt fosting and additional toppings.
Saturday, March 21, 2015
Crispy Baked Chicken 2 Ways

This month's Recipe Redux theme is "Two for One". So basically, one recipe that can be used or eaten two ways. I am a huge fan of leftovers because they are so quick, but I often don't want to eat the same thing two nights in a row. One recipe I love is my crispy baked chicken. The cornstarch and corn flakes help keep the chicken moist and crunchy just like fried chicken, without all of the calories and fat! It is also the perfect recipe that can be cooked once, and then warmed up later or eaten cold on top of a salad.
Crispy Baked Chicken

Ingredients
- 2 pounds of chicken
- 1/4 cup corn-starch
- 1 egg plus 1 egg white, slightly beaten
- 1 cup crushed cornflakes
- 1/4 teaspoon salt
- 1/8 teaspoon freshly ground pepper
- 1/2 teaspoon paprika
1. Filet chicken, cutting chicken breast in half length wise. Pound with kitchen mallet to even out chicken breasts then cut in half again. You should end up with about 8 pieces of chicken.
2. In separate dishes add corn starch, eggs and crushed cornflakes mix with parsley and salt.
3. Lightly coat chicken breasts in corn starch, then coat with egg and then coat with cornflake mixture.
4. Place breast on baking sheet. Cook for 15 minutes, flip then cook for another 5-10 minutes until chicken cooked through.
This week I used the crispy chicken to make a quick chicken parmesan. Once the chicken is cooked I topped it with tomato sauce and mozzarella. I baked it in the oven to allow the cheese to melt then topped it with fresh parsley and served it over a bed of whole wheat spaghetti. Since the chicken was already cooked, I had dinner on the table in under 20 minutes!
Crispy Baked Chicken Parmesan

Ingredients
- 4, 4 ounce pieces Crispy Chicken (see above)
- 1 cup tomato sauce
- 1 cup mozzarella cheese
- 2 tablespoons parsley, chopped
- whole wheat spaghetti
Directions
1. Use cooked crispy chicken, top with 1/4 cup sauce and 1/4 cheese. Bake in 350 degree oven for 10 minutes to allow cheese to melt.
2. Sprinkle with fresh parsley and serve over whole wheat pasta.
The next day I made a crispy chicken Caesar salad with the remaining chicken. I like my chicken cold on salads so I just pulled the chicken out of the fridge, sliced it up and put it on top of a bed of spinach, veggies and topped it with my homemade Caesar dressing. And it only took 10 minutes to prep the dressing and chop the vegetables and chicken!
Crispy Chicken Caesar Salad

Ingredients
Caesar Dressing:
- 1/2 cup plain Greek yogurt
- 1 1/2 tablespoons milk
- 2 tablespoons grated parmesan
- 1 tablespoon lemon juice
- 1 small garlic clove, minced
- 1/4 teaspoon salt
- 1/8 teaspoon pepper
- 4, 4 ounce pieces Crispy Chicken (see above)
- 4 cups of spinach or mixed greens
- Veggies: tomatoes, peppers, etc
- 2 tablespoons Caesar dressing
Directions
1. To make dressing. Add all ingredients to a Mason jar or other bottle with a top. Shake to mix.
2. For the salad. Assemble spinach, top with chopped vegetables, sliced chicken and Caesar dressing.
Saturday, March 14, 2015
Pina Colada Brown Rice Porridge
“By posting this recipe I am entering a recipe contest sponsored by USA Rice Federation and am eligible to win prizes associated with the contest. I was not compensated for my time.”
In honor of National Nutrition Month, the USA Rice Federation is challenging us “recipe reduxers” to come up with a healthy recipe using US grown rice. Rice often gets little praise with all those other super grains out there these days, but rice provides us with many nutritional benefits. Rice is naturally gluten free, low in fat and sodium free and provides high quality protein. Whole grain varieties like brown rice, are high in fiber which can help reduce your risk of chronic disease like heart disease, diabetes and certain cancers. Rice is also convenient and affordable and super versatile in the kitchen.


Rice is often used as a side dish or in an entrée, but rarely is it used as a breakfast food. But, why not?! I am a big fan of rice pudding and thought how about a rice porridge for breakfast? And with my recent trip to Panama and love for tropical fruits I was inspired to make a Pina Colada version of rice porridge. I ended up using leftover brown rice I had from the night before, cooking it with coconut milk and pureed banana and pineapple. For additional crunch and texture I topped it all off with banana slices, almonds and coconut flakes. It ended up being perfect hot for breakfast and just as great cold for a snack the next day. Both ways were equally delicious and definitely made me feel like I was back on the sandy Panama beaches!

Pina Colada Brown Rice Porridge
Servings: 2
Ingredients
- 1 1/2 cups cooked brown rice
- 1 cup unsweetened coconut milk
- 1 banana, divided
- 1/2 cup pineapple (fresh or frozen)
- 1 tablespoon coconut sugar ( or honey)
- Toppings: shredded coconut and almonds (optional)
Directions:
1. In a food processor or blender mix together pineapple and half of the banana.
2. In a medium saucepan, over medium heat, add in cooked rice, coconut milk and fruit blend. Bring to a boil then reduce heat to low and simmer for 20-25 minutes or until desired consistency is reached.
3. Once cooked add in sugar.
4. Serve hot or cold and top with shredded coconut, sliced almonds and slices of remaining banana.
Follow my blog with Bloglovin
Subscribe to:
Posts (Atom)